This page may contain affiliate links. If you make a purchase through one of these links, we may earn a commission at no extra cost to you.
By now, what was once a somewhat obscure technique for high-end chefs has become a lasting trend among passionate home cooks too, and for good reason! Good sous vide technique gives you exceptional control over the final result, and takes away so much of the guesswork and chance of cooking. Instead of worrying and stressing about how to best cook certain foods, you can confidently make them perfectly every single time.
Let me share a little personal story. The first time I made sous vide steaks years ago, everyone at the table was skeptical. They were all traditionalists who thought that surely steak couldn’t be good if it wasn’t grilled. Just a few bites in, though, they declared the steaks the best they had ever eaten. And that was the first time I had ever made sous vide steaks; they’ve only gotten better with time. That’s the power of sous vide.
Table of Contents
What Is Sous Vide?
The short answer is that sous vide (pronounced SOO-VEED; complete pronunciation info here!) is the process of cooking food in a plastic bag that’s placed into a water bath at a precisely controlled temperature, typically for relatively long periods of time.
Of course, that probably leaves you with more questions than answers! Read on to learn about the most common questions as well as the step-by-step process of sous vide cooking in this complete beginner’s guide. And if you still have questions after reading it, please feel free to reach out to us so we can update this piece to be even more comprehensive.
What’s the Point of Sous Vide?
Cooking your food slowly at a precise temperature of your choice allows you to evenly bring the entire piece of food to that specific temperature. You won’t have overdone and underdone patches, and you won’t risk overcooking or undercooking your meal.
The best example of this is a steak. If you’ve cooked them before, you’ve absolutely experienced the disappointment of overcooking or undercooking the meat. You’ve also probably dealt with the stress of wondering, “Is it done? Is it overdone? Is it raw?” Sure, poking it and comparing its feel to parts of your hand or face is a decent cheat to figure out its doneness, but it’s not always reliable. And a minute or two of distraction can be the difference between “perfectly done” and “tough and overcooked.”
Sous vide lets you set your temperature to obtain a perfect medium-rare steak every single time. (Or medium or even well-done, if that’s what you prefer.) There’s no more stress or guesswork; just perfectly cooked steaks every single time.
If you’re a lifelong vegetarian, all this steak talk might have you concerned that this method is just for meat. It absolutely isn’t! And if you’re struggling to relate to the steak analogy for the struggle of cooking to the right temperature, think of eggs instead. How often have you tried to make a luscious soft-boiled egg and ended up with a hard-boiled one instead? Or aimed for hard-boiled and ended up with an overcooked and sulfury egg? Sous vide can solve that problem too.
What Is Sous Vide Best For?
We’ve already touched on two of the absolute best applications for sous vide: meat and eggs. This method lets you cook either to absolute perfection every single time.
With that said, you absolutely don’t need to limit yourself. You can sous vide just about anything, as long as you’re okay with the effects of cooking food this way.
One of my favorite sous vide dishes I’ve ever made was nixtamalized tomato slices in Oaxacan mole sauce that were cooked for most of the day. Other ideas you might not immediately think of include yogurt, infused oils or liquors, and various delicate custards that would normally take constant attention in a bain-marie.
What Equipment Do You Need?
At the most basic level, you need a container to hold your hot water, a way of regulating the water temperature, and a plastic bag to hold your food. As you get more advanced, though, there are all sorts of extra gadgets that you might want to add to your collection. While these aren’t strictly necessary, they can make the process easier and potentially give you better results.
The typical home sous vide setup includes the following items:
- An immersion circulator
- A large container (if you already have a pot large enough for canning, you may not need to get anything new)
- Ziploc (or similar) bags
As you get more advanced, you might find that you want to add more equipment to your list. You might want, for example:
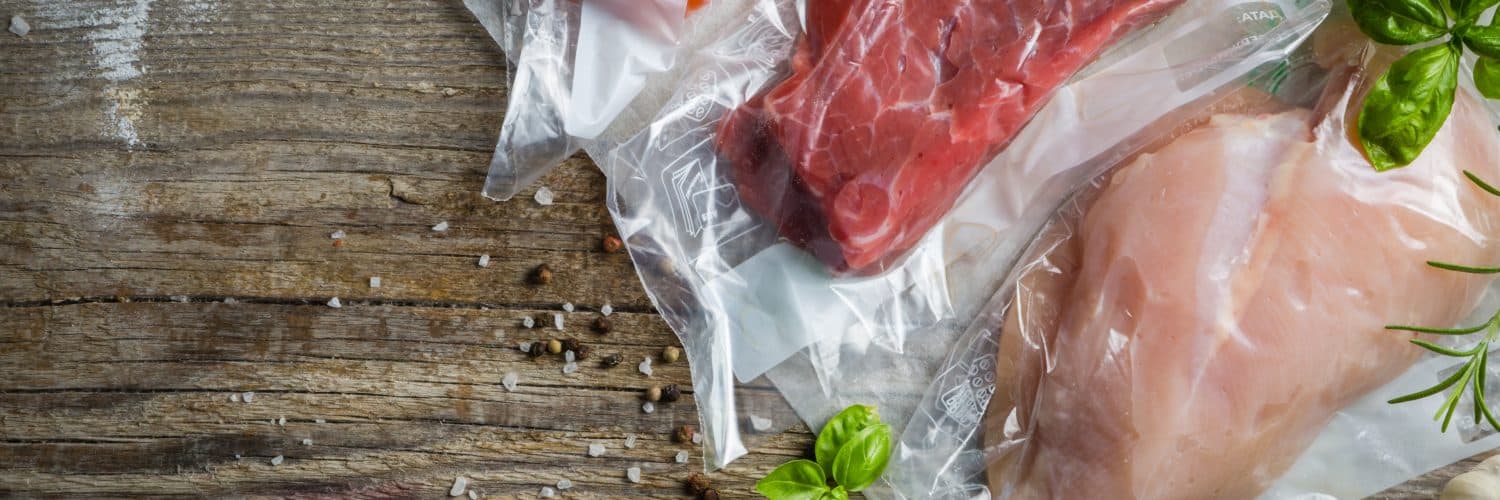
- A vacuum sealer
- Bags specifically made for sous vide cooking
- Sous vide weights
- Clips to hold the bags in the water
- A sous vide rack
- A kitchen torch
Can You Sous Vide in Ziploc Bags?
Yes!
A common question beginners have about sous vide is whether it’s safe to use typical Ziploc bags in sous vide, since they’re heated and then held at elevated temperatures for hours on end. However, Ziploc bags are BPA-free and dioxin-free, which should eliminate most concerns.
For this reason, we recommend using Ziploc brand bags specifically if you can find them. Other brands, especially generic brands, may not use the same quality plastic. If you can’t find Ziploc brand bags, though, CNET recommends doing your research on the brands available to you and locating ones made of high-density polyethylene, low-density polyethylene, and/or polypropylene (and they specify that you should avoid those made with polyvinyl chloride (PVC)).
With that said, there is the slight possibility that a Ziploc (or similar) bag will break or open during prolonged cooking. This is exceedingly rare, but it’s something to keep in mind. If you want to be extra safe and avoid this, you may prefer to use bags specifically designed for sous vide cooking instead.
What to Sous Vide First?
I keep coming back to steak and eggs, but that’s just because I can’t recommend them highly enough for your first time using a sous vide setup. If you eat meat, go for a nice, high-quality steak. If you’re vegetarian, get some gorgeous fresh eggs to soft boil. Either of these options will give you fantastic results and help you understand just how transformative sous vide cooking can really be.
If you’re feeling a little bolder and want something more adventurous, try making sous vide duck confit. This is yet another ideal dish for sous vide cooking, because it allows you to bring the duck to the perfect tender temperature while keeping it surrounded by its own rendering fat. From there, you just finish it as usual to create the gorgeous crispy skin. Yum!
Should You Salt Meat Before Sous Vide? Or After?
We recommend experimenting with this to figure out what you prefer! In general, though, we prefer to salt afterward. Salting meat before you sous vide it can lead to tougher or more rubbery results; exactly the opposite of the beautifully tender food that you’re going for with this method.
Our preferred process is to cook the meat in its sous vide bath, then remove it from the bag, pat it dry to remove any juices that have escaped, salt it, then sear it.
The only exception that we make to this rule is with fish. Sous vide fish can actually be too tender, or even mushy. The extra firmness provided by salting first can be the perfect remedy to this, leading to fish that’s tender without falling apart.
Oil or No Oil?
In most instances, you don’t absolutely need to add oil or fat to the bag containing the food you’ll sous vide. This is great news if you’re counting calories and want to avoid adding more than necessary (and can even be one of the benefits of sous vide cooking). In fact, with red meats, adding fat is not only unnecessary but can actually lead to a worse result.
For some foods, however, you’ll definitely want to add oil. The best example is fish, which generally benefits from the addition of fat. (Use olive oil or butter depending on your taste and preference.) The extra oil gives the fish some wiggle room in the bag, allowing it to maintain its shape better as it cooks. Plus it dilutes the ugly white stuff (albumin) that often forms on salmon, leading to a more presentable final dish.
Chicken breasts are one of the unusual cases that could go either way. Oil isn’t necessary and may draw some of the flavor out, but it also helps the breast maintain its shape and look better when it’s done. We recommend you experiment and figure out your own preference with this particular meat!
Do You Have to Sear After Sous Vide?
Do you technically have to? No. But should you? Resoundingly yes, at least when you’re cooking a food that should have some browning on the outside.
Sous vide foods end up cooked perfectly all the way through, but they don’t have the gorgeous browning that results from the Maillard reaction on the outside.
To effectively create the Maillard reaction, you want to expose relatively dry foods to temperatures ideally between 266°F or 130°C and 356°F or 180°C. This is hotter than you’ll cook your food in a sous vide water bath, and the plastic bag prevents this reaction from occurring to any significant extent anyway.
So once you’ve cooked your meat to the perfect temperature in your sous vide bath, pat it dry, season it, and sear it. You’ll get the best of both worlds this way, and create a truly incredible meal.
Naturally, none of this applies to foods that wouldn’t be seared to begin with. Of course you won’t sear a soft-boiled egg or a custard! But if you’re making a food that would typically be seared, don’t skip this vital step.
Basic Sous Vide Technique: The Step-By-Step Process of Sous Vide Cooking
Step 1: Determine Your Cooking Temperature and Time
The temperature at which you cook your food and the cooking time both depend completely on what you’re cooking and the results you want to achieve. It’s next to impossible to offer generalities on this.
Get started by following a sous vide recipe from either:
Both of these sites offer tried-and-true recipes for sous vide cooking, and will give you a great starting point to figure out the time and temperature you should use.
For quick reference if you’re starting with a steak, as recommended, here are Anova’s guidelines:
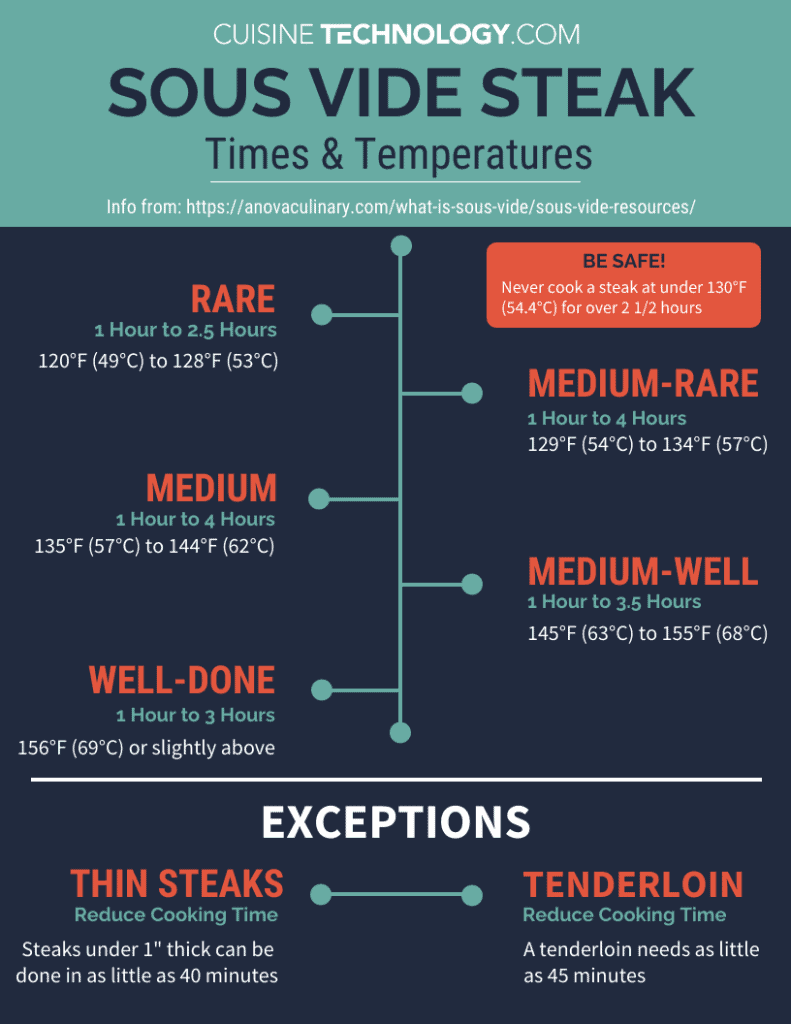
For a tenderloin steak, you can lower these cooking times to as little as 45 minutes instead of an hour, and stay on the lower end of the cooking temperatures.
Time and temperature are a delicate balance with food safety. If you’re concerned, read more in our guide to safety with sous vide cooking. But in short, the reason that Anova recommends a maximum cooking time of 2.5 hours for a rare steak is that it’s unsafe to hold it at a temperature that low for a longer period. The USDA explains that the temperature “danger zone” is between 40°F (4.4°C) and 140°F (60°C), so you won’t want to cook your food for too long if your selected temperature isn’t at least 140°F (60°C).
Step 2: Prepare Your Sous Vide Water Bath
Fill a large container with water, and insert your immersion circulator. Make sure the water is high enough on the circulator (the instructions should explain how high it needs to be), and that there’s also enough room below the circulator.
Set the circulator to the temperature you decided on. Depending on your device, you may also be able to set the cooking time. If you do, the timer will begin once the water reaches the target temperature.
Step 3: Place Your Food in the Bag
Place the food you want to cook into a Ziploc bag (or a bag specifically made for sous vide cooking). It’s vital to make sure that there’s plenty of room in the bag; it should be very easy to close with lots of extra space, not stuffed full.
Add any flavoring ingredients you want, like herbs or spices.
Read our section above on oil in sous vide cooking, but as a refresher: add fat (olive oil or butter) if you’re cooking fish or something equally tender. Don’t add fat for red meats. Also, remember that we generally don’t recommend salting your food before you sous vide it. Instead, you can season it afterward.
Step 4: Seal the Bag
Yes, this seemingly simple process deserves a step of its own! The trick here is that you need to remove as much air as possible to ensure a safe, evenly cooked, and delicious result.
If you have a vacuum sealer, this step is really easy. Just follow the manufacturer’s instructions to vacuum seal your bag.
If you don’t (yet!) have a vacuum sealer, you’ll need to use the water displacement method to remove the air from your bags. In short, you’ll mostly seal the bag with just one corner open. Slowly lower the bag into water, which will force the air up and out of the opening. When the bag is almost fully immersed with only the opening exposed, finish closing it.
For more details on this process, including step-by-step pictures, check out our complete guide to the water displacement method. And if you want to make things easier and more thorough in the future, consider buying a vacuum sealer. We’ve done a comparison of the best vacuum sealers to help you figure out which one is right for you!
Step 5: Cook Your Food
Yes, it’s finally time! At this stage, your water bath should have reached its goal temperature and your food should be sealed in bags with as much air removed as possible.
At this point, you’ll immerse the bags in the water bath. Ideally, they’ll sink into the water. If they float, however, you’ll need to weigh them down to keep them fully submerged.
Options include clipping something weighted to the bottom of the bag to pull it down, putting something heavy inside the bag (in its own separate bag to keep it away from the food), or even using a metal vegetable steamer to press everything down. If the steamer on its own isn’t heavy enough, it becomes a barrier that you can put other weighted items onto to hold the bags down.
Now that your food is fully submerged in the water at the correct temperature, it’s time to start the timer! Your immersion circulator may do this for you, but if not, set a timer and be ready to come back to your food when it goes off.
Step 6: Season and Sear Your Food (optional)
Remember that not all sous vide foods need to be seasoned and seared after cooking. (Can you imagine trying to sear a soft-boiled egg or a delicate puree? I hope not!) If you’re cooking meat, though, this step is absolutely vital for an amazing result.
Your meat will probably look unappealing, pale, or even soggy after it’s done in its sous vide bath. This is because the Maillard reaction, which creates the delicious and beautiful browned crust on the outside, hasn’t occurred.
This is a simple fix. Pat the food dry, season it with salt, and sear it on each side. Keep in mind that it’s already cooked through, so you’re only searing the outside and not trying to actually cook it further. You can do this in either a hot pan (we love cast iron for this purpose!) or with a kitchen torch.
Step 7: Enjoy!
Congratulations—you’ve just successfully made your first sous vide meal! We hope that this complete guide helped you feel more confident in the process. If you have any questions that weren’t addressed here, we’d love to hear from you so we can update the guide to be as comprehensive as possible.
And we’re always excited to see what readers make, so please feel free to comment with a link to a picture on Instagram, Facebook, or similar of your first sous vide dish. We can’t wait to take a look!